Preferred apps and settings on my MacBook Pro
This is a rundown of my preferred MacBook setup for professional and everyday use.
If you think of any traditional profession you will probably be able to name some of their daily tools without much effort.
A firefighter drives a firetruck and blast their hose, a pilot needs a plane and bad-ass sunglasses, a teacher brings their knowledge and books and a doctor wears scrubs with a stethoscope around their neck.
But what about a work-from-home Internet Wizard?
I just retired my MacBook Pro from mid 2012 which has served me well for over 8 (?!) years. That’s pretty insane, especially when you think back to the 90s. Back then you almost had to change computer every second year - just to be able to install the latest version of Windows.
When my new MacBook Pro 16” arrived I decided to not just copy everything over. Instead I wanted to start from a clean slate. This gave me a unique opportunity to document the process. I compiled everything into this post; basically a list of apps and configurations I need to complete in order to feel @127.0.0.1.
Hopefully it will give you some inspiration. And if you make it all the way you will find a few hacks that will make your life more productive.
Security first
First step is to enable some security and backup measures in case the laptop breaks, gets lost or stolen. This significantly reduces the risk for data being lost forever or ending up in wrong hands. Included in this step:
- Setting a safe password
- Install a password manager
- Enabling FileVault - encrypts your hard drive
- Enable Firewall - blocks unwanted internet traffic
- Activate Find My Mac
- Install VPN
Setting a safe master password
Old practices have unfortunately encouraged the wrong behaviour in us: “Minimum length of six, at least one number and at least one special character”. This statement only gives us passwords that is hard for humans to remember, but easy for computers to guess.
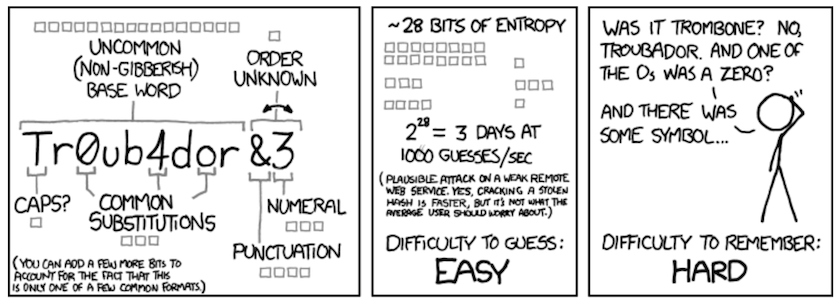 Password Strength. XKCD
As a result many feels the need to write it down on a post-it next to their screen. This defeats the purpose of having a password in the first place.
Use a strong password that you change regularly (1 month intervals). You should set a long password (20+ characters) by making a combination of common words.
Since you are going to type it often you might as well use it to enforce positive habits as well. E.g: Exercise2timesperweek
![]() Install a password manager
Install a password manager
All other passwords you use in the future should be generated and stored by a password manager. Personally I use 1Password.
Let the manager generate and store a long unique password everytime you signup for a new service online. This way, if one service is compromised (which will happen), any attack will be isolated to that service alone. “Have I been pwned?” allows you to check if your account has been compromised in a data breach. If so, it’s time to rotate your password(s).
1Password syncs all passwords across my devices. You may use the browser extension to help you prefill the username, password and even two-factor-authentication every time you login. With my new MacBook I can use the fingerprint reader to unlock 1Password instead of entering the master password again and again.
![]() FileVault and Firewall
FileVault and Firewall
Go to System Preferences → Security & Privacy to enable FileVault. This secures the data on your disk by encrypting its content automatically. You need to set a recovery key that you store in a safe place.
While you are here you should also activate the Firewall to prevent unauthorized incoming and outgoing traffic.
![]() Activate Find My Mac
Activate Find My Mac
Go to System Preferences → Internet Accounts and add your iCloud account if you haven’t already, then scroll down to “Find My Mac” and tick the checkbox.
In case your MacBook is lost or stolen, you can login to iCloud.com. There you can locate your device but also tell it to wipe all data. Nowadays you can locate the Mac even if it’s not connected to internet, as long as other Apple devices are in close proximity.
![]() Install VPN
Install VPN
I use a Virtual Private Network (VPN) service whenever I need to connect to a WiFi that is not mine. This mitigates the risk of other people intercepting my internet traffic.
It also gives me the ability to circumvent geo-blocking (restricted content based on my geographical location). This makes it possible to e.g. explore the Netflix catalog in another country or watch Swedish television even if I’m abroad.
I personally use OVPN which is priceworthy, it comes with a decent desktop client and it works on my phone too.
Other important settings
There are some other necessary changes that are often overlooked. At work we use Kolide to automatically scan all devices in the company. Highly recommended. If any check fails, it will send a private Slack message to that team member with instructions on how to apply necessary changes.
Anyway, here are some settings you should make from start:
- You should always lock your computer whenever you leave it out of sight (
⌃ Control + ⌘ Command + Q). But in case you ever forget, make sure you activate: Require password immediately after sleep or screen saver.System Preferences → Security & Privacy → ✓ Require Password... - Force file extensions to always be visible in Finder. Malicious downloads will often be an executable disguised as an innocent file. E.g:
Read Me.txt.pkg. As default, the Mac OS will hide the “.pkg” part. If we instead force it to always show the file extension, you are less likely to run malware unintentionally.Finder → Preferences → ✓ Show all filename extensions - Out of the box your Terminal allows other apps on your computer or network to detect and record what commands you type. Not ideal. This can be prevented by enabling Secure Keyboard Entry.
Terminal → Click Terminal (in menu bar) → ✓ Secure Keyboard Entry - Prevent sensitive notifications to be shown on lock screen.
System Preferences → Notifications. For each app in the list, make sureShow notification on lock screenis unchecked, or notifications is turned off. - Prevent sensitive notifications to be shown when presenting on external screen/projector.
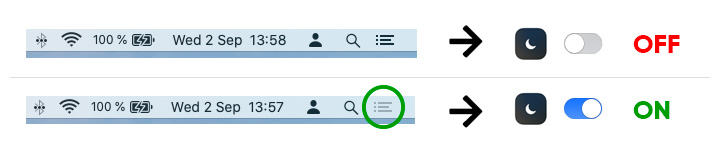
System Preferences → Notifications → Do Not Disturb → ✓ When mirroring to TVs and projectors - Not a permanent setting, but still important. Whenever you share your screen (like in a video call) you will be saved from potential embarrassment by preventing notifications. Make it a habit to always turn on Do Not Disturb. Unfortunately this feature is a bit unknown and hidden. The fastest way to turn it on is to hold down the
⌥ Optionkey and click on the list icon button in the upper right corner of the screen. Whenever it is grey then Do Not Disturb is activated and no notifications will popup on your screen.
Cloud storage
![]() I’m a big fan of Google Drive and use it to backup all my files and photos, both on my laptop and my phone. By using a paid plan on Google One all my family members get terrabytes of cloud storage each. It’s so convenient to have everything stored in one place. Forever safe, forever accessible. Easy to share photos, documents and files.
I’m a big fan of Google Drive and use it to backup all my files and photos, both on my laptop and my phone. By using a paid plan on Google One all my family members get terrabytes of cloud storage each. It’s so convenient to have everything stored in one place. Forever safe, forever accessible. Easy to share photos, documents and files.
I just download the Backup and Sync desktop app and select which folders I want to sync. Some files I only keep in the cloud.
I also use Dropbox for automatic screenshot sharing (more on this later) and because my accounting firm receives all my receipts that way.
Because of this setup I have no use for iCloud. So the next thing is to turn iCloud off, except for “Find My Mac” and Keychain. System Preferences → Internet Accounts → iCloud
Cosmetics and launcher
It’s time to make some changes to enhance the usability and looks of macOS.
Alfred
![]() When it comes to launching apps I’m a heavy user of Alfred. This is an app that inspired Apple to launch their clone: Spotlight Search. I still prefer Alfred because it’s faster, cleaner and offers more functionality. I use it to efficiently launch apps, do quick calculations, convert currencies, search Google, among other things. I just hit the hotkey
When it comes to launching apps I’m a heavy user of Alfred. This is an app that inspired Apple to launch their clone: Spotlight Search. I still prefer Alfred because it’s faster, cleaner and offers more functionality. I use it to efficiently launch apps, do quick calculations, convert currencies, search Google, among other things. I just hit the hotkey ⌥ Option + Space and type away. The premium version also comes with a nifty clipboard history log.
Dock
![]() Next I like to clean up the Dock. It’s quicker to use Alfred to launch apps compared to moving the mouse to the bottom of my screen. So I like to keep the Dock minimal and only add the apps that I truly use frequently. In my Dock you’ll only find Finder, Chrome, Spotify, Calendar, Terminal, Slack and VSCode.
Next I like to clean up the Dock. It’s quicker to use Alfred to launch apps compared to moving the mouse to the bottom of my screen. So I like to keep the Dock minimal and only add the apps that I truly use frequently. In my Dock you’ll only find Finder, Chrome, Spotify, Calendar, Terminal, Slack and VSCode.

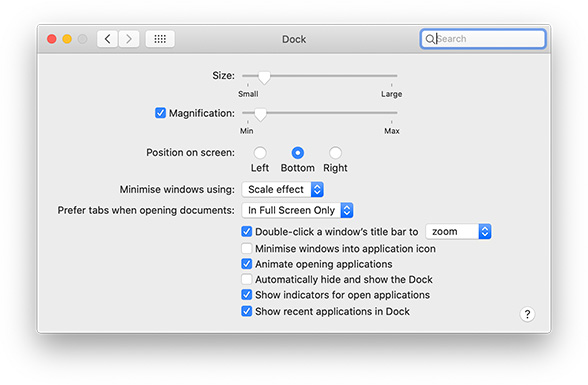
Personal preference: I like to make the Dock significantly smaller than the default settings. Head over to System Preferences → Dock to shrink the Size. Out of old habit I also turn on a small Magnification and change the Minimise windows using to Scale Effect.
Finder
When I made the switch to Mac the Finder was the hardest part to get used to. We eventually made peace after making some changes.
First, I make sure the Tab Bar and Status Bar is visible View (menu bar) → Show Status Bar, Show Tab Bar. I also customize the Tool Bar (View (menu bar) → Customize Toolbar) by adding a New Folder button and remove Share and Edit Tags since I never use them.
I then create the folder Sites in my home directory where I will store all my web projects. Go (menu bar) → Home → New Folder, name it Sites and add it to the side bar via drag-and-drop.
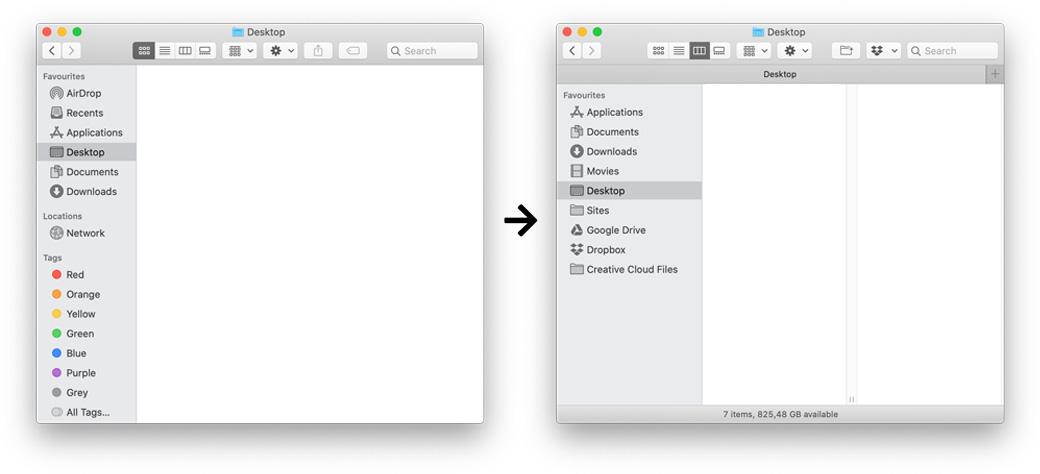
Next I clean up the Sidebar, add some folders to Favourites and rearrange it. I always use Column view, and change the item grouping to Kind except for the Downloads folder where i use Date Added. This way the latest files in Downloads are always on the top.
I’m using Google Drive and Google Photos over the Apple equivalents, so I normally just remove those folders from the sidebar (Right click the folder → Remove from Sidebar) along with tags (Finder (menu bar) → Preferencess... → Tags → Uncheck all manually).
Calendar
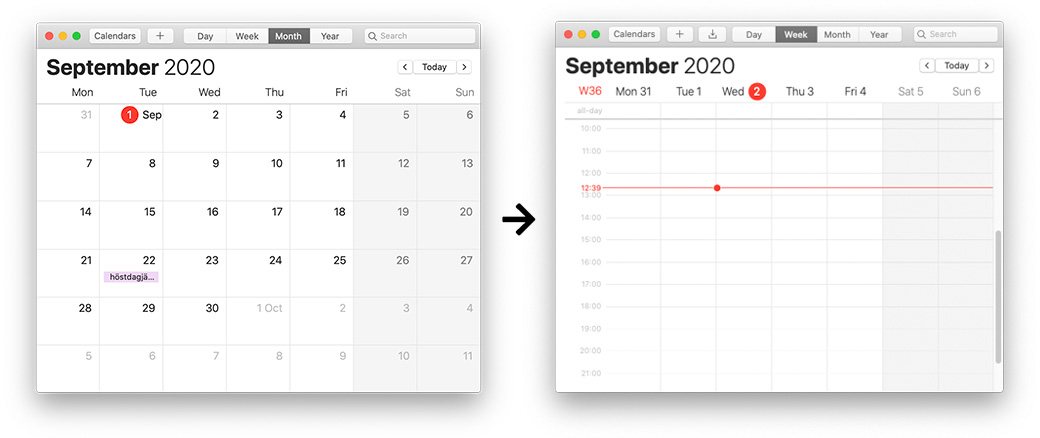
Weekdays starts on Monday, no discussion (Calendar (menu bar) → General → Start week on: Monday). In Scandinavia we are dependent on week numbers (Calendar (menu bar) → Advanced → Show week numbers). And my preferred overview is set to Week.
Terminal
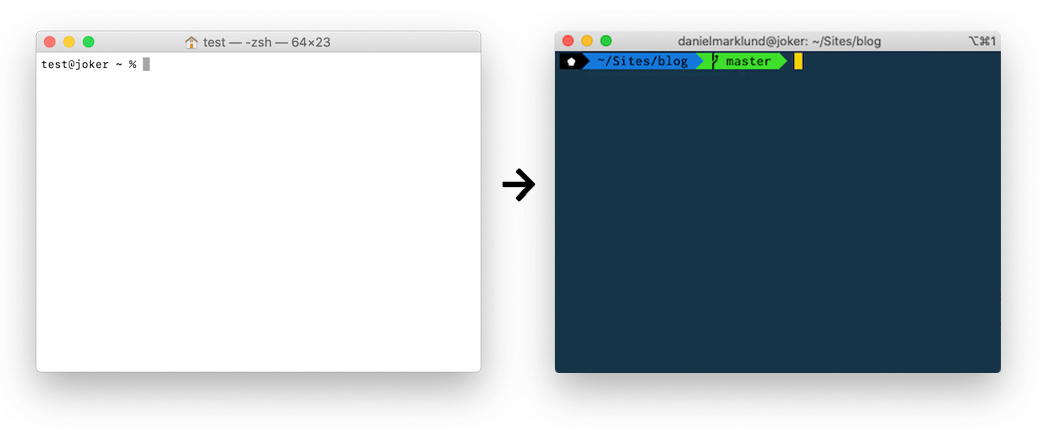
Time to pimp the Terminal. This process is covered in a separate blog post: How to pimp your Terminal in macOS
Software
Last step is to install all applications that I use on a daily basis.
Alfred
![]() This is the nifty launcher I mentioned before. I just hit the hotkey
This is the nifty launcher I mentioned before. I just hit the hotkey ⌥ Option + Space and type away to launch any app, do a quick calculation or to google something. Their premium version also comes with a clipboard history which is useful when you are abusing copy-paste as much as I am.

![]() 1Password
1Password
My favorite password manager that keeps passwords safe and synced across devices.
![]() Slack
Slack
I’ve been working remotely since 2015 and Slack is the goto solution for every day communication.
Adobe Creative Cloud
![]() In my teenage years I did a lot of photo manipulations for fun. And that’s how I first learned Photoshop. Ever since that day Adobe has been part of my toolbox. Illustrator and InDesign for print, After Effects and Premiere for video. Photoshop still lingers on, even though I don’t use it for design work anymore.
In my teenage years I did a lot of photo manipulations for fun. And that’s how I first learned Photoshop. Ever since that day Adobe has been part of my toolbox. Illustrator and InDesign for print, After Effects and Premiere for video. Photoshop still lingers on, even though I don’t use it for design work anymore.
Figma
![]() When it comes to web design, logos and illustrations I use Figma nowadays. It’s also great for creating interactive prototypes that can be sent to clients for approval. Figma is a super versatile design tool that you can run straight in your browser if you need to. One major advantage is that you can collaborate on projects in real time and easily share design resources with other team members. It’s like Sketch on steroids.
When it comes to web design, logos and illustrations I use Figma nowadays. It’s also great for creating interactive prototypes that can be sent to clients for approval. Figma is a super versatile design tool that you can run straight in your browser if you need to. One major advantage is that you can collaborate on projects in real time and easily share design resources with other team members. It’s like Sketch on steroids.
![]() Visual Studio Code
Visual Studio Code
VSCode is currently my go to code editor. Like any other competitor it comes with a great open-source directory of extensions and themes.
Spotify
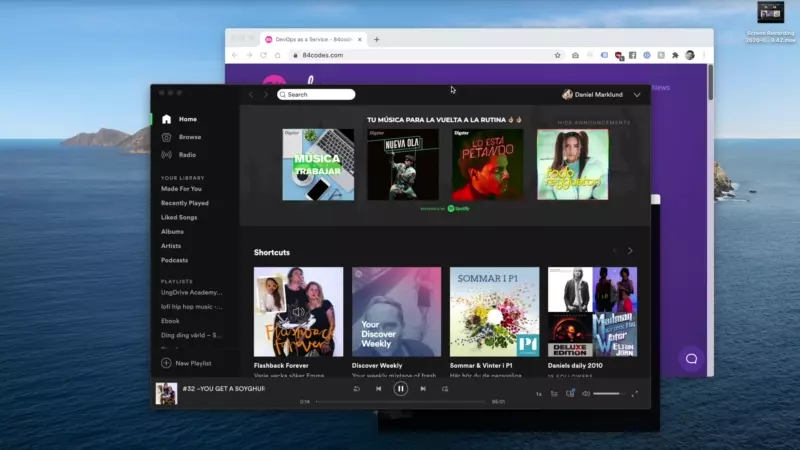
![]() Spotify has evolved beyond a simple music streaming service. I find myself switching from my favorite playlists, podcasts and their personalized suggestions. And their “discover” features just keeps getting better and better.
Spotify has evolved beyond a simple music streaming service. I find myself switching from my favorite playlists, podcasts and their personalized suggestions. And their “discover” features just keeps getting better and better.
Better Snap Tool
![]() This is a great little tool that helps you position windows on your screen. It will automatically resize the windows when you drag them to any edge of your screen.
This is a great little tool that helps you position windows on your screen. It will automatically resize the windows when you drag them to any edge of your screen.
Tomato 2
![]() For productivity / time management I like the Pomodoro Technique. It truly helps me focus by breaking down my work into 25 minute intervals followed by a short break. To keep track of the sessions I use Tomato2 which is basically just a digital kitchen timer.
For productivity / time management I like the Pomodoro Technique. It truly helps me focus by breaking down my work into 25 minute intervals followed by a short break. To keep track of the sessions I use Tomato2 which is basically just a digital kitchen timer.
Screenshot
![]() This is an app that comes preinstalled, but well worth mentioning. I use it almost everyday to quickly take screenshots. By pressing
This is an app that comes preinstalled, but well worth mentioning. I use it almost everyday to quickly take screenshots. By pressing ⌘ Command → ⇧ Shift → 4 you activate a crosshair that allows you to select an area you want to snap. Or if you then press Space you can select an entire Window (including dropshadow, but excluding other windows or desktop wallpaper). Just click the mouse button.
I use this in combination with Save Screenshots to Dropbox, a feature that is built into Dropbox which automatically uploads the screenshots and creates a public link. Neat.
Browser settings and others
I use Chrome as my default browser with a login so history and bookmarks are synced across my devices. I get a long way with the built in Developer Tool and Inspector when building websites and apps. On top of that I make sure to install some extensions.
uBlock Origin
uBlock is a handy content blocker that hides certain ads and limits my spread of cookie crumbles.
News feed eradicator
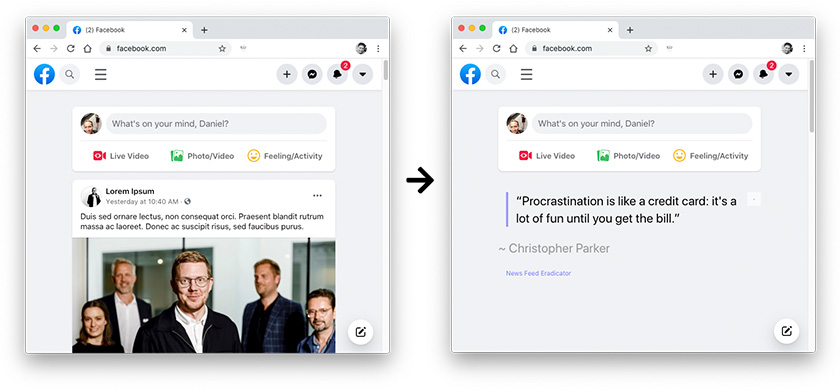
For years I’ve been using this lovely extension that removes the news feed on Facebook (and/or Twitter if you want). I don’t have the Facebook app installed on the phone. But I need Facebook for work (ads) and communication with friends and clients. But I don’t want to get sucked in everytime I need to visit the page. News feed eradicator removes the daily feed and replaces it with nice quotes. Huge time saver!
Messenger, Instagram and Whatsapp
Many people are unaware that you don’t need to visit Facebook in order to send messages to your friend. Just simply open Messenger.com in your browser instead. And you can use Instagram and WhatsApp on your computer. Which is great, because I type so much faster on a proper keyboard.
Wrapping up
I salute you for making it this far! I hope you found it useful. Drop a comment if you have a killer tip that I’ve missed, or if you have any questions.